Robotic Manipulation at Home via Imitation Learning
This article describes some of my initial experiments with real-world robotic manipulation. While I read many papers on robotic manipulation as part of my Masters at Stanford (CS326!) and worked on hand position sensing for Tesla's Optimus when I interned there in the summer of 2023, I figured there is no better way to learn about robotic manipulation than to try and do it in the real world. Since my interest and expertise is in artificial intelligence and machine learning, I primarily focused on the software side of robotics and purchased a MyCobot 280 M5Stack with the goal to get it to reliably pick up a small orange earplug and return to its starting position via teleoperation and behavior cloning. The following describes my setup, software framework, and how I discovered and resolved problems along the way to achieve this task!
The code for this project is available at https://github.com/alex-vesel/robotics/
Hardware
Robot Hardware
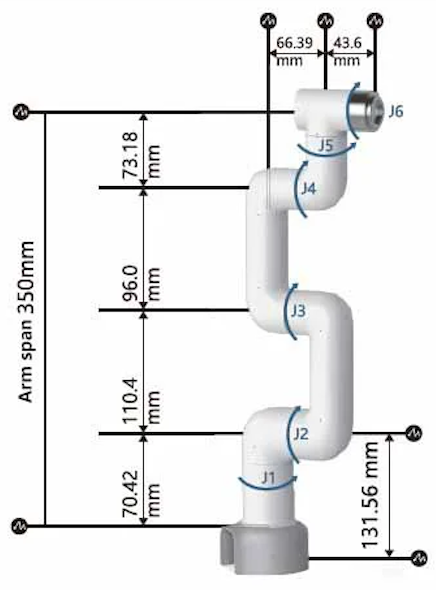
I selected the Elephant Robotics MyCobot 280 M5Stack as my robot arm for the project primarily due to it having 6 degrees of freedom, low weight, an arm radius that would fit my desk, and an effective price point. I used the Elephant Robotics adaptive gripper as my manipulator. The MyCobot has a Python API pymycobot that interfaces with the arm's firmware to control the joints and gripper (however I ran into subtle problems with this library, more on this later). I likewise selected the Intel Realsense D435i as my primary workspace camera for the project due to its low minimum depth distance and integrated IMU which I figured could be useful for future projects involving 3D reconstruction and/or NERFs.
I performed my initial experiments just using the workspace camera as my primary sensing modality, but ran into problems where the robot would get "confused" when it approached the earplug, starting to go back up before the earplug was securely in the gripper. I realized this problem was due to state aliasing where the arm occluded the workspace camera's view of the gripper when the arm was in a low position, and as such, the model could not know if the gripper had the earplug or not. I resolved this problem by adding a wide FOV fisheye wrist camera to the arm.
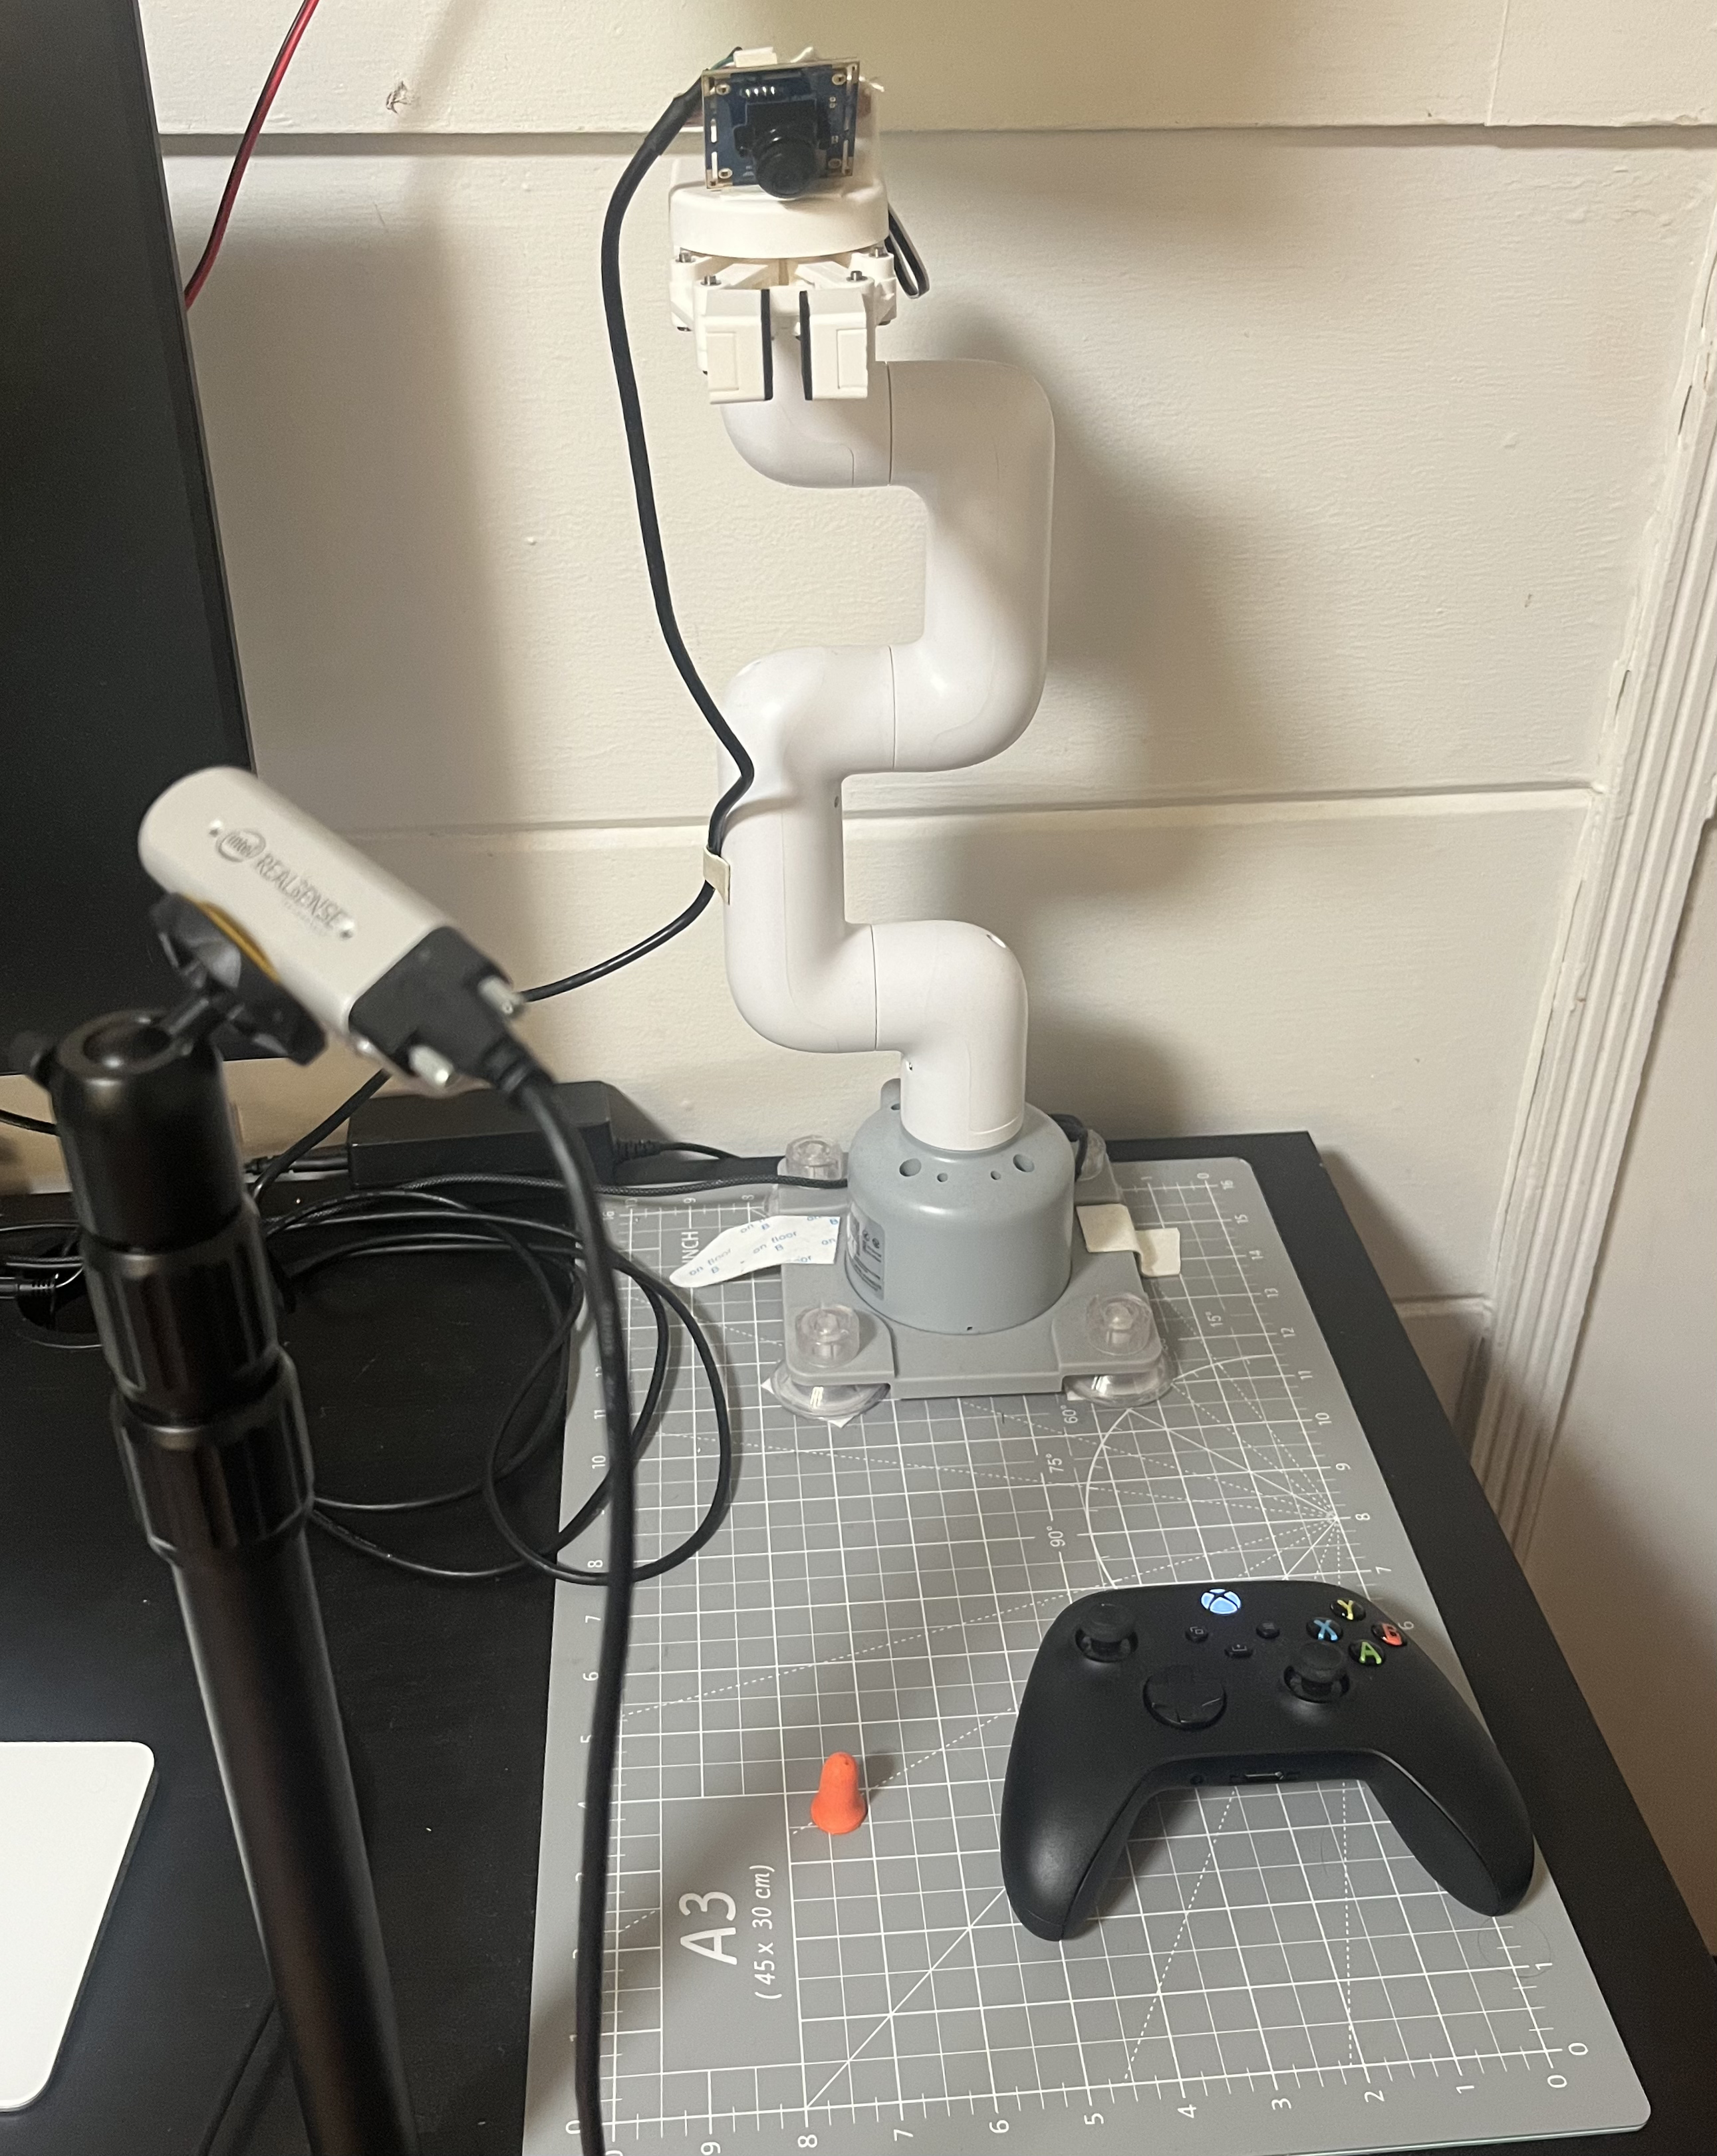
An image of the robot workspace and sensors.
Teleoperation Hardware
There are numerous ways to teleoperate a single 6 DoF robot arm, including using a second "leader" arm to guide the real robot "follower" arm, using some 6 DoF tracker (VR controller, ArUco tracking) and inverse kinematics to control the arm's end effector position, or direct control of the joints using a keyboard or joystick. I ultimately decided to go with direct control via an Xbox wireless controller due to the ease of setup.
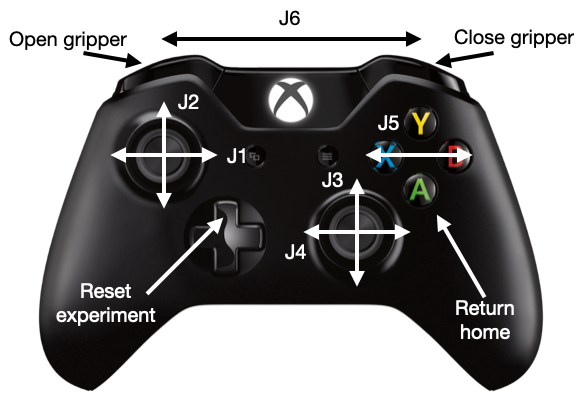
Xbox controller mapping for teleoperation.
Computer Hardware
I performed all teleoperation data collection using my MacBook Air M2, transferring it over to my PC build for training on an Nvidia 2060 Super.
Software
Teleoperation
I built a custom teleoperation data collection framework. At every timestep the framework receives the teleop command from the joystick, then captures the images from the cameras, logs the images and associated metadata, and then executes the command on the robot. I found it to be extremely important that the order of these events is extremely important so as not to violate the Markov assumption. In early experiments, I captured the teleop command then immediately executed the command, followed by capturing the images. The problem with this is that by the time the images are captured the robot is already moving, resulting in blurry images. More importantly, even ignoring the blur problem, capturing the images after executing the command violates causality in that the command from the expert now corresponds to some image from the future. This was a very subtle issue that caused big modelling problems, and I found that the corresponding models lacked fine manipulation skills and could not pick up the earplug. Once I fixed the order of these operations the model immediately improved.
Modelling
I used a neural network I call ImageAngleNet to model the classic behavior cloning objective of:

The behavior cloning objective. State and action pairs are drawn from the dataset of expert demonstrations.
The model receives the aligned RGB and depth image from the workspace Intel Realsense camera, the RGB image from the fisheye wrist camera, and the current robot joint angles and preprocessed as follows: the images are resized to 224x224 and normalized by the max value for each channel (255 for RGB and 4096 for the depth channels), then normalized between -1 and 1. I only used hue/saturation/value jitter for data augmentation.
The preprocessed images are then passed into my custom ResNet10, which is a typical ResNet with a single residual residual block in each of the four ResNet stages (I try to keep my models as small as required to achieve the task, I found that scaling to a ResNet 18 provided no benefit). The arm angles are likewise processed by a small fully connected network (FCN). The features from these processed observations are then concatenated and then processed by another FCN neck before being passed into the output heads. One output head uses a TanH activation function to predict the 7 DoF (6 for the arm, 1 for the gripper) angle delta for each action chunk and the other output head predicts the auxiliary binary classification task of whether the gripper has an object in its control or not. This was useful for debugging the policy during execution.
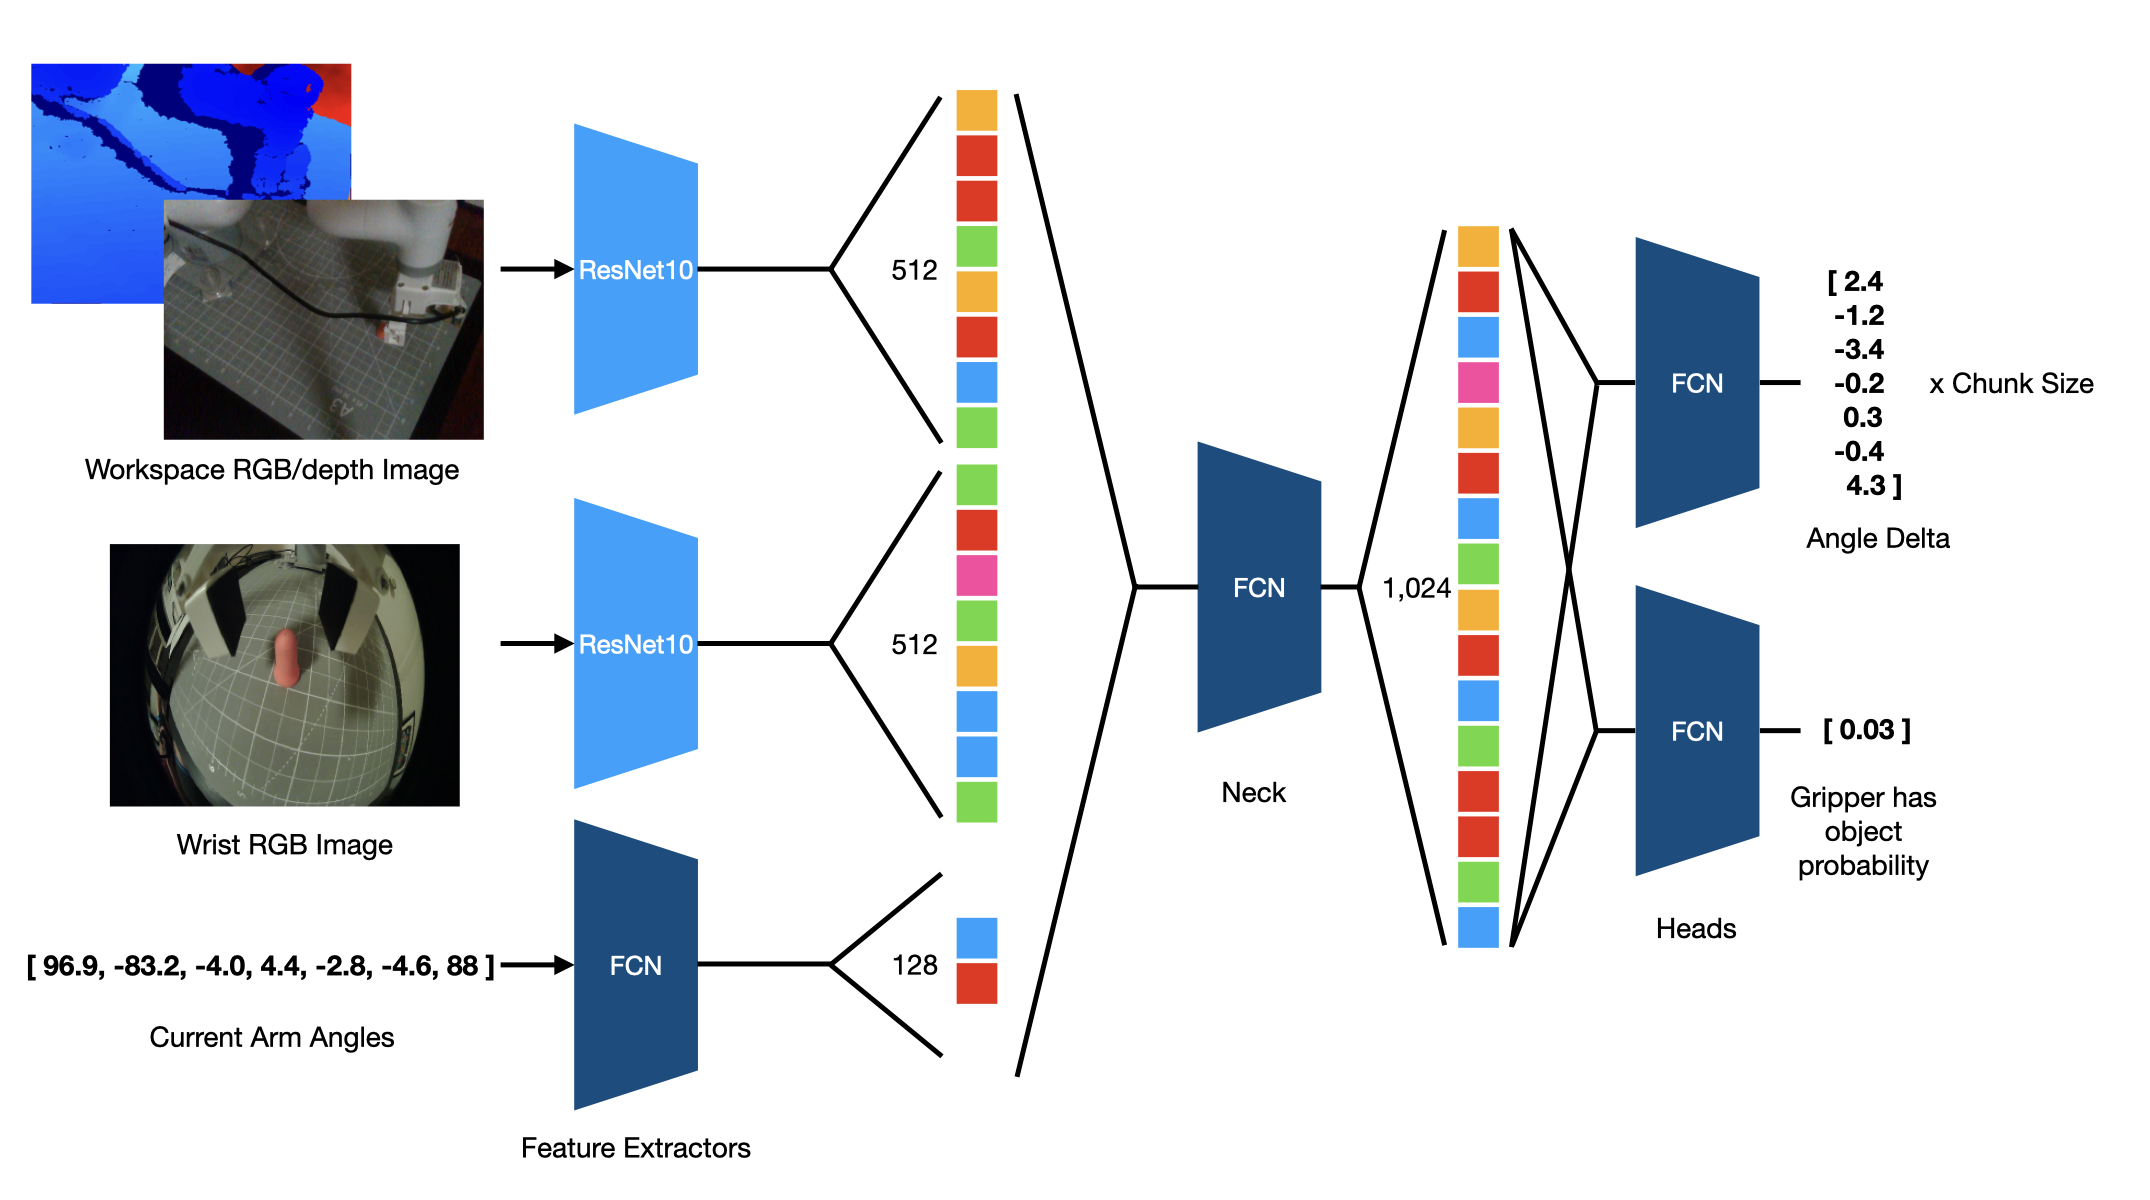
ImageAngleNet architecture. The model receives the RGB and depth images from the workspace camera, the RGB image from the wrist camera, and the current joint angles as input. The model predicts the angle delta for each action chunk and whether the gripper has an object in its control.
Problems and Solutions
I encountered a number of subtle problems when trying to get behavior cloning to work. This section describes the problems and the solutions I used to overcome them.
Action Chunking
The classic problem with single step behavior cloning is compounding errors. In this archetypal setting, a model is trained to predict the expert's action one step into the future. However, small errors in each prediction compound as the policy is rolled out, leading the robot into out of distribution states where error accumulates more. Action chunking addresses this problem by instead training the model to predict the next k steps of expert actions, effectively reducing the effective horizon of any given task by k-fold, leading to less possibility for compounding errors. This method can be combined with temporal ensembling whereby overlapping action predictions can be averaged to decrease prediction noise by incorporating the k predictions for any given timestep. I found that this method instantly improved the success rate of my model.
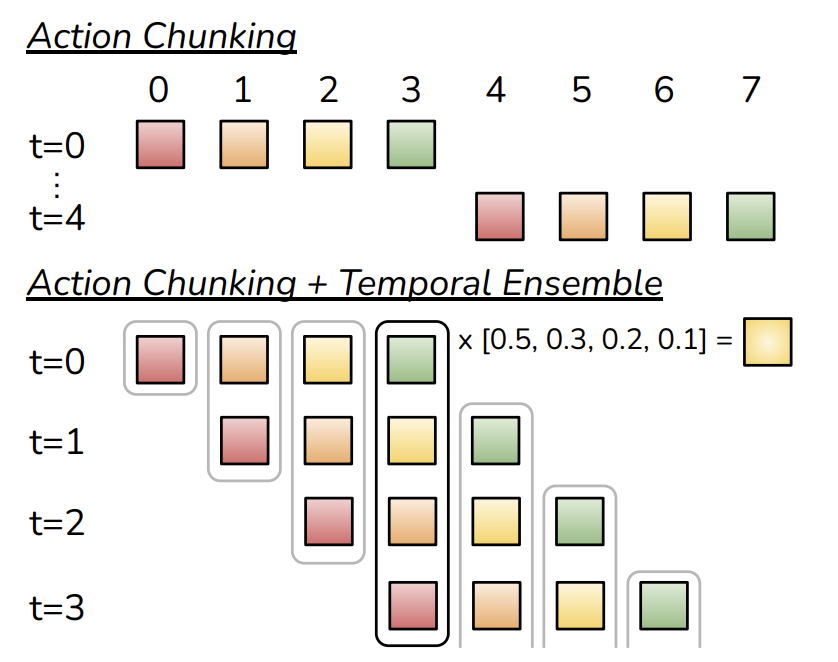
Two approaches to action chunking with chunk size 4. On top the model is called once every 4 timesteps and the chunk is rolled out with no correction. On bottom the model is called every timestep and overlapping action predictions are averaged using an exponential weighting scheme to reduce prediction variance. I used the approach on the bottom with chunk size of 5. 1
DAgger and DART
Another solution to compounding error involves modifications to the data collection process. As mentioned above, one problem with the compounding error in behavior cloning models is the robot reaching states not seen in the expert distribution. For example, I found that when I collected data I sent the robot arm straight towards the earplug from the starting position, meaning that the only states where the robot is near the workspace are when it is also near the earplug. This led to models that could not recover when the robot went to a low position near the workspace but not near the earplug. The Dataset Aggregation (DAgger) method involves iteratively querying the expert to label states that the model reaches when rolled out 3. In my case, I took a similarly inspired approach to start my data collection in different robot starting states, i.e. close to the workspace but not near the earplug.
Another method called Disturbances for Augmenting Robot Trajectories (DART) more directly addresses the problem of compounding error by injecting a small amount of noise in the expert's actions as they are collecting data. In my case, I sampled a small amount of gaussian noise and added it to the commands I sent to the robot through teleop. This method works by effectively allowing the model to recover from small amounts of error in its predictions because these small error states are now effectively in-distribution of the training set.
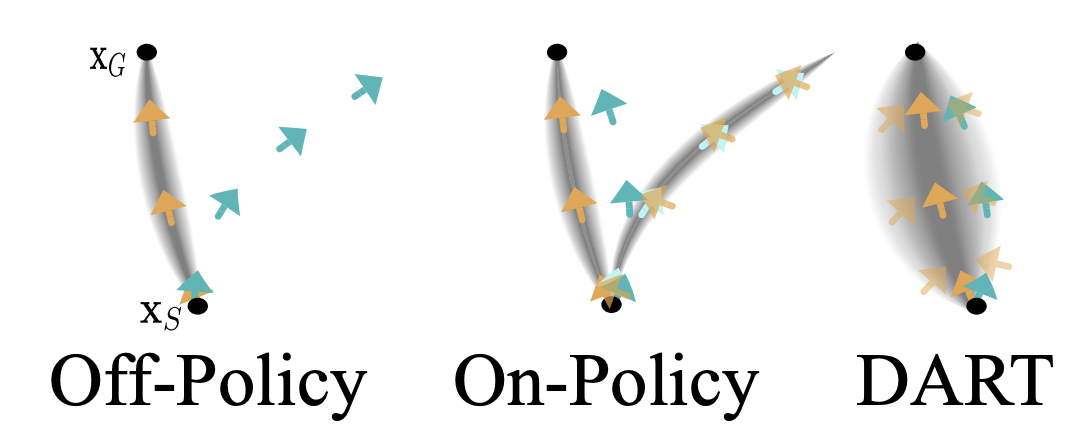
Examples of different approaches to addressing compound error during data collection. The typical off-policy approach suffers from compounding error, while on-policy methods like DAgger can correct from the current policy's error states. DART adds Gaussian noise to the data collection process and allows the model to correct from small errors during rollout. 2
I combined both of these methods in my data collection process, DART was an "always-on" method in my data collection while DAgger was used to address common errors I found as I iterated on models.
Code Efficiency Improvements
My first pass at writing the teleop and control code was quite slow at ~1 Hz control frequency. After investigating the bottleneck points, I was able to increase control frequency to ~15 Hz which allowed for a smaller teleop angle delta scale, more accurate modelling, and smoother control. I would like to get this control rate even faster, but the primary bottleneck now is the overall speed of the MyCobot firmware and the fact that MyCobot firmware requires two commands to move the robot arm and gripper as opposed to just one command to move them both simultaneously. The following are inefficiencies I discovered and how I improved them to get the 15Hz control rate.
pymycobot Package
Elephantic Robotics offers the pymycobot Python package to allow interfacing with the firmware on the MyCobot 280. The package offers simple Python functions that send serial commands to the robot and is quite easy to use and get started with. However, I found a few inefficiencies in the package's code that significantly slowed down the control rate of the robot. For example, there are a number of commands in the MyCobot firmware that send a response, such as getting the angle of the encoders, and there are also many commands that do not send a response, such as commanding the servos. However, in the Python package sending any given message waits for a response or timeout, and sends the message up to three times until the response or timeout is received. This effectively means for messages with no response we must wait 3x the timeout to return. I significantly increased the control rate by adding a list of no response commands that would break out of this timeout loop immediately after sending the first message. I also decreased the timeout length as I found a shorter duration was adequate to safely receive responses.
Threading for Data Capture and Logging
Another major bottleneck to my code performance was performing all camera capture and teleop logging sequentially. Once I put the two cameras' data capture on dedicated threads and used multiple threads to log all the images and metadata associated with teleop performance significantly increased.
Intel Realsense IR Projector
I found that the Intel Realsense depth camera I was using had small dot artifacts in the RGB image, especially in low light conditions. These dots caused a lot of variation in the resulting RGB images, leading to models that were very sensitive to noise. For example, I found that the variation in predicted angle deltas could vary by 1 to 2 degrees even though the RGB image features looked similar to the human eye. Through some internet research, I found that this dot problem was caused by the autoexposure on the Intel Realsense camera. Once I turned off autoexposure the dots disappeared and the model produced more consistent outputs under image noise.

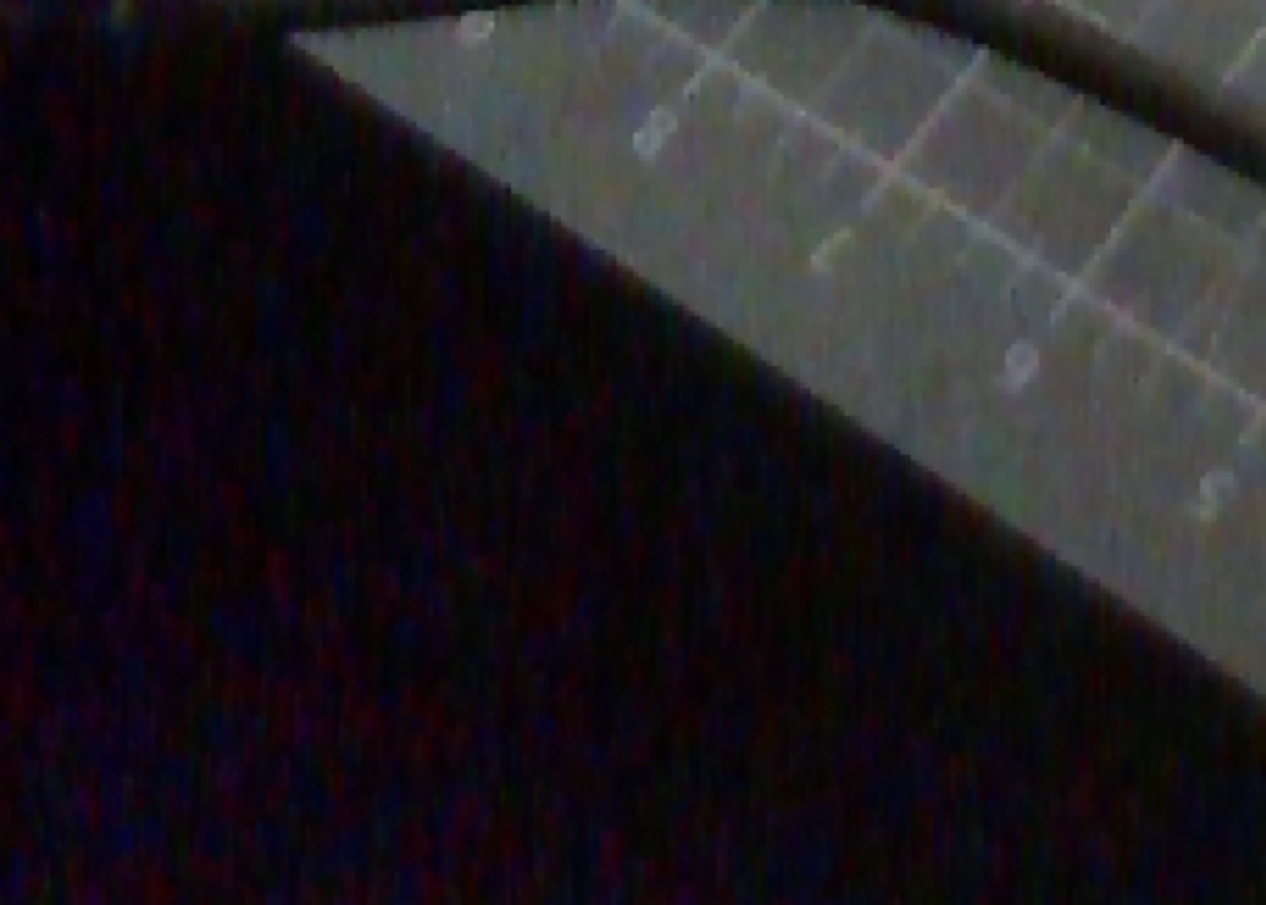
Left: Crop of a RGB frame with autoexposure on, showing dot artifacts.
Right: Crop of a RGB frame with autoexposure off, showing no dot artifacts.
Results
The following videos showcase the model's performance on the earplug manipulation task. All videos are 1x speed and autonomous. The slight jerkiness in the motion of the robot is due to the model outputting small angle deltas and the overall processing speed of running the model and sending commands being longer than the time it takes for the robot to move to the commanded position. The primary speed limiter is the speed of the MyCobot firmware, not running the model.
The video on the right is an extra video showing a wider perspective of the demonstration while the two videos on the left are the wrist and workspace images that are actually fed to the
Video of the model picking up the earplug and returning to the starting position.
Another video of the model picking up the earplug from a different position and returning to the starting position.
An example of an error case where the earplug is initially placed at the edge of the workspace. I did not collect as much data in this position, so the model goes to the wrong spot initially, closing the gripper on a phantom earplug. The model corrects and moves over to the actual position of the earplug, but accidentally pushes it down. Eventually the model corrects and picks up the earplug without an intervention.
Moving the earplug just as the gripper is about to close. The model can generally move to the new position of the earplug, but not with 100% success rate because less data is collected from states where the gripper is close to the workspace but not near the earplug. The model gets stuck at the end of this demo.
I included some demos of the gripper picking the earplug from my hand instead of from the workspace in training.
Future Work
I have a few ideas for future work. One direction would be train the model to handle a wider range of tasks. The data collection and model training would mostly remain the same, but the model would instead take in a string describing the task to be completed. I have already implemented a few tasks such as placing the earplug in a bowl and picking up different objects. Moving further, I could introduce an orchestrator in the form of an LLM to chain together different subtasks to execute larger goals, such as organizing various objects.
Another direction would be to explore sim-to-real and real-to-sim transfer to learn the earplug pickup task. There is some exciting work in this area and it is quite in line with how Nvidia and others in industry are going about creating real-world AI that generalizes.
One other direction would be to improve the model's efficiency using reinforcement learning. The current model is trained off of my teleop data, which is not the most efficient at executing the policy. For example, when teleoping I usually would control the first two joints first to get the arm close the earplug, then refine the position using the other joints. In no way am I executing the optimal series of joint controls to minimize the time required to pick up the earplug. I could potentially fine tune the model using an on-policy reinforcement learning algorithm such as PPO to make the policy more efficient.